Lulu's Top Pregnancy Exercises
Lulu Adams is a pre and post natal specialist personal trainer based on the Isle of Wight. She is mummy to one-year-old Willa, and is expecting baby number two in February.
“My journey into pre and postnatal fitness began way before I was actually pregnant – but having gone through the experience of pregnancy itself (not such an easy one), labour (a lengthy, and ‘not the one I planned’ one) and the recovery period (a lot longer than I thought...) has simply strengthened my passion for helping mummies stay strong, healthy and happy during this stage of their lives – whilst also appreciating the massive changes that their bodies have, are still are going through. It’s not about rushing back into your skinny jeans by throwing yourself straight back into sit ups and planks; it’s about rebuilding your strength from within”.
Generally speaking, I tend to advise pregnant clients to combine endurance, strength and flexibility elements into their prenatal exercise ‘programme’. As soon as I say that though I get asked to provide a generic, go-to pregnancy workout for people to do themselves at home or at the gym…
As wonderful as it would be to be able to provide this, each and every pregnancy is so very different, so it is incredibly difficult to come up with ‘one size fits all’ pregnancy workout, because there are so many factors – such as core strength, pelvic floor health and the stability of your pelvis – to be considered when working out what exercises are suitable, and will be beneficial to you. I advise all my clients to get in touch with a women’s health physio and a good chiropractor as early as they can in their pregnancy, to get an idea of what is going on ‘down there’ and with your abdominal wall (especially if this is not your first pregnancy...)
Having said that though, below are my favourite exercises and a couple of my favourite stretches that are generally considered safe and beneficial for all stages of pregnancy, that you can easily do as stand alone exercises, or altogether as a circuit. For a great, full body circuit, do each exercise for 12-15 reps (or 8-10 reps on each side if a single-sided exercise) before moving onto the next, and repeat the whole circuit two to three times.
DISCLAIMER: Please make sure you consult your doctor or midwife before starting or continuing with any sort of exercise programme, including the exercises listed above. If you experience ANY unusual symptoms (especially dizziness, pain or bleeding) during your workout, stop and make sure you consult your healthcare professional as soon as you’re able to. Some of these exercises are also not suitable for those suffering from pelvic girdle pain. If you are having regular treatment from a chiropractor please ask their advice on the exercises below, as generally speaking, standing or bearing a load on one leg is not advised for those suffering from lower back/pelvis pain.
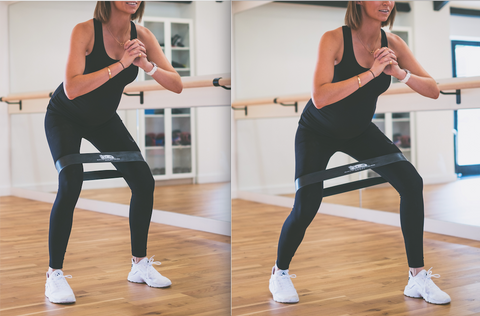
1. Monster Walk
The Monster Walk is a great glute activator, because by resisting the ‘pull’ of a resistance band whilst moving, it encourages the gluteus medius to fire up (the muscles on the side of your bottom), and by strengthening these muscles, you are instantly providing greater support for the hips, knees and even the lower back.
- Place resistance band (available on Amazon) around your knees. In the images below I have a band placed above my knees; to make this more difficult, you can move the band lower, with around the ankles being the hardest.
- Bend forward at your waist (this will help to make sure you’re working the glutes) but keep your spine in a neutral position – you will naturally want to round your back and ‘tuck’ your bottom under, but try to resist this by keeping your tailbone pointed up towards the sky as you bend forward.
- Keep shoulders back and down, and your chest open.
- Knees should be bent at about 45’, and keep them pushed out, in line with your ankles and don’t let them buckle in from the pressure of the resistance band.
- Slowly walk forwards for five steps (and then five steps backwards, which is the killer!) while keeping this alignment of the knees over the ankles.
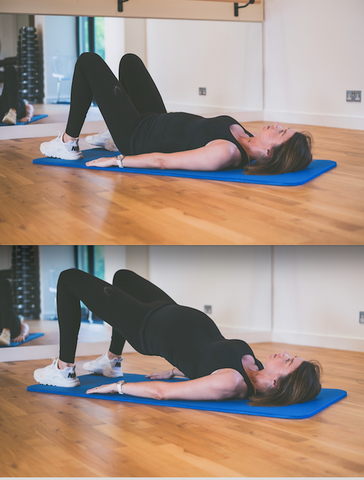
2. Glute Bridge
The glute bridge is good ‘bang for your buck’ exercise to do during pregnancy – not only for activating and strengthening the glutes, which tend to become weakened due to the postural changes that take place as the bump grows, but it also helps to improve core stabilization, which in turn helps to protect, or at least reduce strain to the lower back.
With minimal equipment needed, the glute bridge can be done anywhere, and can also be made more challenging by adding a resistance band or weights, elevating the feet, elevating the hips OR making it a single leg exercise.
- Lie on your back on a mat, with your knees bent and your feet flat and in line with your hips*
- Make sure your back and pelvis are in ‘neutral’ – so there should be a little gap (one finger width) between your lower back and the mat
- Inhale, relaxing your pelvic floor and allowing your tummy to gently rise
- Exhale, lifting your pelvic floor, activating your deep core by imagining you have a magnet on each hip bone that are gently drawing towards one another and drive your hips up towards the sky, pushing through your heels.
*yes, you can still lie on your back after 16 weeks contrary to some pregnancy fitness myths AS LONG AS YOU FEEL OK! If you feel at all nauseous or dizzy in this position, carefully roll onto your side and push yourself up to seated and give this exercise a miss (for alternative for later stages of pregnancy, feel free to get in touch: @luluadamsfitness or lulu@lulusfitness.com.
3. Squat
I see squats featured in almost every pregnancy training programme – and that’s because they are a great all-round exercise that works lots of muscle groups, including the glutes, lower back and and importantly the pelvic floor.
- Start by spreading your feet hip width apart. In the photo I am using dumbbells as I am used to training with weights, but you can also do these with resistance bands around the knees or even without any bands or weights.
- Inhale, relax your pelvic floor and send your hips back as if you were going to sit in a chair; if you can get your thighs parallel with the floor great, but stick to a range of movement that feels comfortable
- At the bottom of the movement, exhale, lift your pelvic floor, activate your deep core by imagining you have a magnet on each hip bone that are gently drawing towards one another and come back up to standing by driving your weight through your heels
However, do make sure you can FEEL your pelvic floor connection on the exhale breath as you rise up out of the squat. If you can’t, stop and think about regressing the exercise (so removing the weight)
I also suggest using a Swiss ball against a wall as a prop for squatting once you hit the third trimester, and leaning against this as you lower yourself down into a ‘squat’ position to avoid excessive strain to the lower back and knees. You can still have weights to challenge yourself (and the glutes especially!) but it just takes the pressure off joints that will already be feeling quite unstable.


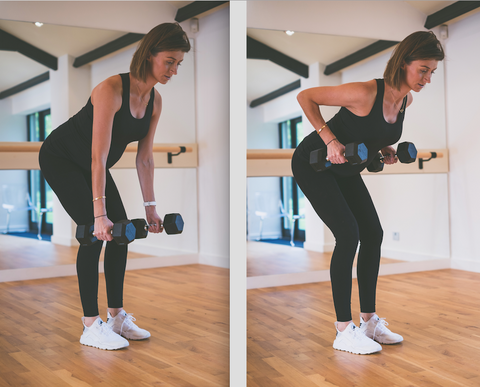
4. Bent Over Row
A great exercise for strengthening the muscles in the upper back, which can also become weakened during pregnancy due to our growing breasts, and the natural adaptations our body makes to the S-shaped curve of the spine to help us carry the growing bump without toppling over…!
- Hold a dumbbell in each hand, arms down by your sides and palms facing each other, and bend forward slightly from your hips, keeping your back long and neutral – so a little curve in the lower back – and your neck in line with your spine, so keep your gaze focused on a spot on the floor about a metre in front of your feet.
- Keeping your elbows close to your body, bend the elbows and lift the weights towards your lower ribs and pause at the top of the movement.
- To make this more challenging, do one arm at a time, concentrating on keeping your body level and not twisting with each lift.
If you haven’t got dumbbells, or you suffer from very low blood pressure and staying in this bent over position makes you feel a bit dizzy, you can also tie a theraband (available on Amazon) around a doorhandle and perform a ‘rowing’ motion in an upright standing position.
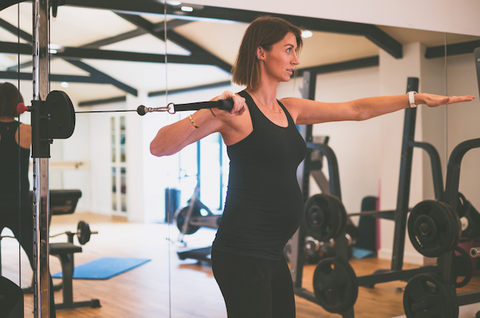
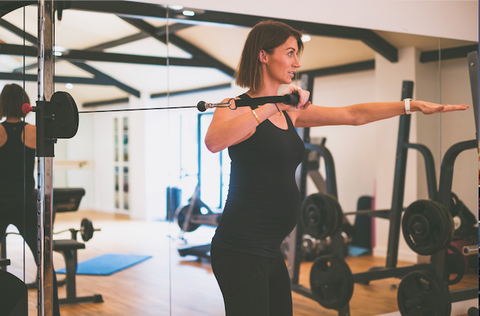
5. Single Arm Standing Cable Press
This is a fab exercise that not only works the arms and upper body but also works to help improve our core strength and stability because the focus should be on keeping the body stable and not twisting with each push.
- Take a split stance, so have one leg out in front on which you have your bodyweight, and the other foot a step behind, just resting on the ball of that foot. The foot out in front should be the opposite side to whichever you are going to ‘press’ the cable with.
- If using a cable machine (you can also use dumbbells), make sure the pulley is chest height and face away from the equipment. I like to put my ‘non-working’ arm out in front to help me balance – and I pull my shoulders back and down, trying to get my shoulder blades to meet just above my bra strap and stay there
- Inhale, and relax your pelvic floor and allow your tummy to gently expand outwards (don’t force it!)
- Exhale, lifting your pelvic floor and activating your deep core by imagining you have a magnet on each hip bone that are gently drawing towards one another and push the cable away from you, being careful the rest of your body doesn’t twist with the pushing movement. Pause at the end of the movement, and then inhale as you return the handle to the start position.

6. One Arm Carry
If you haven’t already, ditch the crunches and sit ups NOW! Although probably fine to continue with in early pregnancy, it’s good to familiarize yourself with safer, pregnancy-friendly core exercises as soon as you can.
This is great ‘crunchless’ core exercise that can help with those stabilizing muscles that support your spine. Basically the main focus of this exercise is to resist the body’s urge to lean sideways to ‘bear’ the weight of the load you’re carrying, and you do this by using your deep core muscles to keep your body in optimal alignment as you slowly walk whilst carrying the weight.
In the images below I’ve highlighted the correct alignment, along with what to avoid.
- Make sure your shoulders are back and down – bring your shoulder blades together at your bra straps.
- Have a slight bend in the elbow if you need it, and keep your elbow as close to your ear as your body will allow (this will depend on your shoulder flexibility!)
- Make sure your ribs are down and not thrusting out, so line them up directly above your hips.
- Slowly walk ahead, keeping your body in this alignment as you move.
As your pregnancy progresses, you can adapt this by making it a ‘suitcase’ carry, so still keeping it one-sided and resisting the urge to lean over as you move, but this time carrying the dumbbell down by your side rather than overhead which adds more pressure to the core. And again, if you don’t have dumbbells, just find a big bottle of water, or a can of beans!
What to do...

What not to do...

7. Cable Straight Arm Pulldown with Leg Lift
Another great core stabilizing exercise. The focus here should be on keeping your lower back in a neutral alignment throughout the exercise – and trying not to ‘tuck’ your bottom as you lift your leg. You also want to try and keep the pelvis as level as possible, so if you imagine your pelvis as a bowl of soup, you want to avoid ‘spilling’ any of the soup – so no leaning into the supporting leg.
- Have the cable pulley set as high as possible, and use the rope handle attachment.
- Start by gripping the rope handles in both hands, have your arms straight out in front of you, and check your spine is in neutral, so a slightly curve in the lower back, your ribs stacked over your hips, shoulders back and down.
- Inhale, releasing your pelvic floor and gently letting your tummy expand outwards – but don’t force it!
- As you exhale, lift your pelvic floor and engage your deep core by imagining you have a magnet on each hip bone that are gently drawing towards one another and lift one leg up so the thigh is parallel with the floor. Pause at the top of the movement, taking care to keep your body straight and in neutral alignment, and then inhale as you lower the foot back down to the floor.

And again, if you haven’t got dumbbells, you can also tie a theraband (available on Amazon) around a doorhandle do the same movement by ‘pulling down’ with straight arms and lifting one leg up so your thigh is parallel to the floor.
8. Upright Pigeon Pose
This might look familiar to any yogi mummies out there! I love the Pigeon pose as a way of rounding off a session in the studio to open up the hips, but I tend to keep it upright rather than leaning forward and down onto my forearms – mainly because bump won’t allow it, but I find I’m more able to get into my hip flexors this way.

9. Plantar Fascia Release (Toes Pose)
The image below makes this ‘stretch’ look ridiculously easy, right? Well you’d be surprised! I picked this up in a yin yoga class I did a few years back, when I too scoffed at the idea of being asked if I could ‘hold’ this position for five minutes, but what this is great for is releasing and relieving the plantar fascia on the bottom of the feet, which can become inflamed as we gain weight throughout our pregnancies and have a knock on effect on the rest of our muscular systems and lead to our alignment and posture going awry.
If you can give this a go a few times a week you’ll be amazed at what sort of aches and pains you’ll be preventing. As I said, this is incredibly deceptive – you’ll find yourself experiencing a wave of sensations as those five minutes tick on, some serious burning and even slightly painful sensations might arise, so if you need to, put your hands on the floor in front of you to take the weight off the fascia but try and keep as still as possible throughout the five minutes and just take note of how the sensations change!

10. Elevated Child’s Pose
And finally, this is my ultimate when it comes to relaxing after a full body workout! You can use a bed, a sofa, or a Swiss ball as I am below. Gently sway from side to side as you take nice, deep, relaxing breaths in this position, stretching out your ribs and waist by pushing your upper body down towards the floor.
